How to Record Games on Steam in 2022
If you want to record gameplay on Steam, you need a good Steam game recorder.
What is a good game recorder for Steam? First, the recorder should be able to record videos of your gameplay on Steam without causing the games to lag. And the videos should be recorded in high quality, capturing gameplay at 120 fps or even higher. And you may also want it to be able to record Steam video with game audio, commentary, and webcam.
If this is the recorder that you are looking for to record Steam games, you are in the right place. This article will introduce 3 gameplay recorders that are used by most YouTubers and gamers to record videos on Steam. Let’s see how to record on Steam!
Record Steam Gameplay Without Lag with Screen Recorder
The first recorder introduced here is Movavi Screen Recorder. By enabling hardware acceleration, the Movavi screen recorder can record Steam gameplay with little impact on the overall performance so that it won’t slow down the game. What’s more, this screen recording software had recently launched a new feature: Game Recorder. It is a feature specially designed for game recording.
Movavi Screen Recorder has nearly everything you need in recording gameplay on Steam:
- Record game audio as well as your commentary through the microphone.
- Support webcam overlay so that you can record your face along with the gameplay.
- Start and stop recording games with hotkeys, or schedule a gameplay recording at a specific time.
- Multiple video recording modes, supporting browser overlay, System information overlay, and more.
- Support annotating in videos with texts, circles, arrows, lines, and more.
- Record videos on Steam to MP4, WMV, AVI, GIF, TS, MOV, F4V files.
- Taking screenshots of wonderful game moments.
- Restore the unsaved gameplay.
Not only that it is full-featured, but the recorder is also well-designed with a user-friendly interface for you to start screen recording without extra instruction needed.
Method 1. Using Movavi Screen Recorder to Record Steam Gameplay
Screen Recorder is an almighty function of Movavi Screen Recorder. It allows users to record high-quality video with the audio of the system and the microphone. You can also turn on the webcam and customize it in the process of recording.
Step 1: Download Movavi Screen Recorder
Download and install the Movavi Screen Recorder on your Windows or Mac computer.

Step 2: Customize the Recording Settings
Launch the recorder, click Screen Recorder. Choose your recording region, turn on/off the webcam and the audio of the system and the microphone.
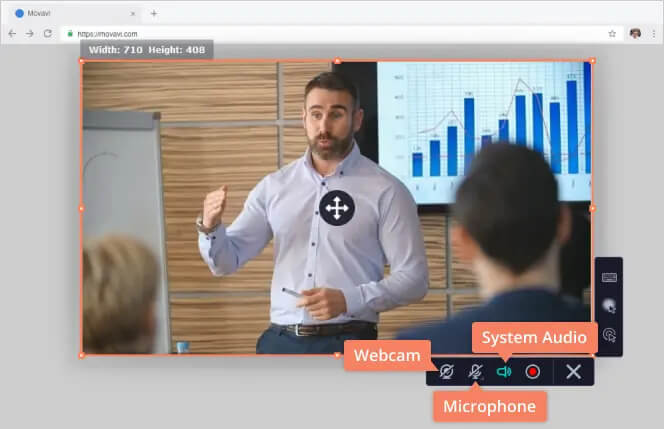
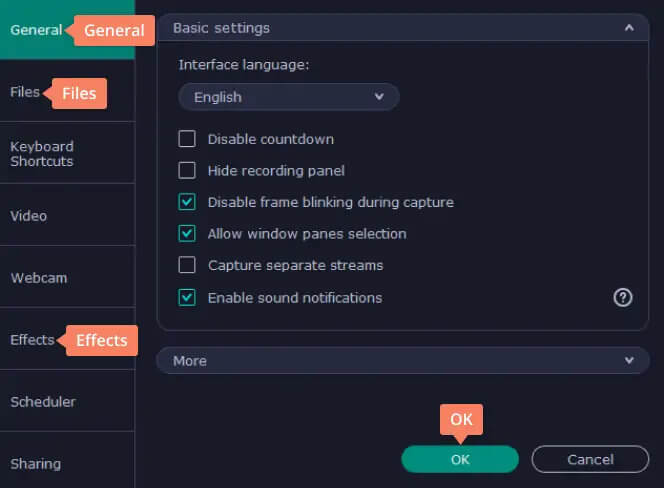
Then click the gear icon to open the Preferences menu, where you can change settings such as hotkeys, video quality, frame rate, video format. Click OK after you have selected the ideal settings.
Step 3: Start Recording Steam Gameplay
Open the game. Click Advanced Recorder and you can also set the recorder to record Steam gameplay only or exclude the screen activities of certain apps.
It is recommended to turn on “Microphone noise cancellation” and “Microphone enhancement” to make the voice clear and have a soundcheck before recording. Webcam can be turned on/off during the recording, too. When you are ready, click the Rec button or press Ctrl + Alt + S keys to begin recording videos of the game.
Step 4: Take Screenshots, Add Annotation/Texts (Optional)
During the gameplay recording, you can use a keyboard shortcut to take a screenshot any time you want. Or adjust the volume level of your microphone or game audio with the recorder’s floating panel.
Also, there are annotation tools you can use if you want to highlight something in the game.
Step 5: End Gameplay Recording on Steam
When the game is over or you feel like ending the recording, press the Ctrl + Alt + S keyboard shortcut or click the Rec button to end it. You can also click the Clock icon to set a recording length and let the recorder automatically stop video recording when time is up.
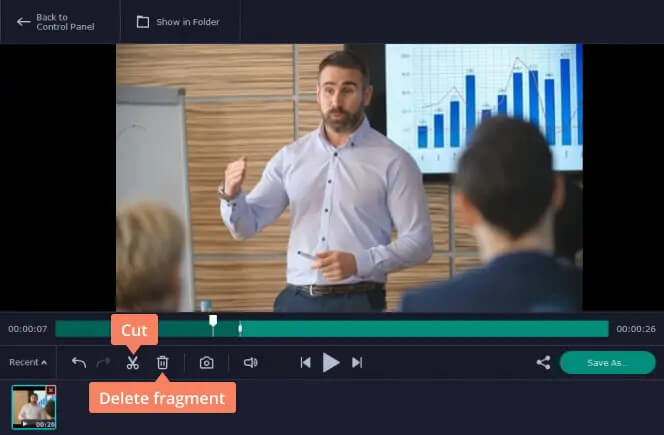
The video of the Steam game is recorded. You can preview the recorded video or cut the video to get the most amazing clip. Then click Share to upload the video to YouTube, Facebook, Vimeo, and more.
Method 2. Using Gecata to Record Steam Gameplay
Other than the function mentioned above, there is a new feature of the Gecata – Game Recorder. Having taken users’ experiences and suggestions into consideration, the function provides Windows users with the best game recording experience.
Step 1. Download Gecata.
Step 2. Launch the program. Click Game Recorder.
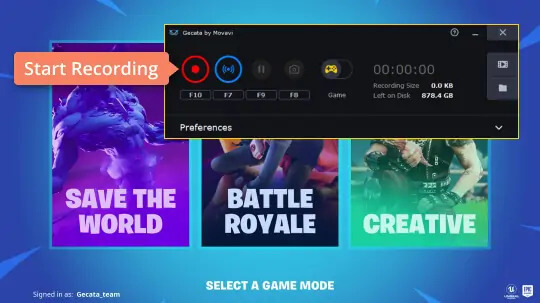
Step 3. Change Settings Before Recording.
On the setting page of Game Recorder, you can select the game you want to record. The program will automatically locate the game without being interfered with by the other programs. Then customize the audio settings. You can have a soundcheck beforehand in case you have to adjust the volume while recording. Click REC to start recording.
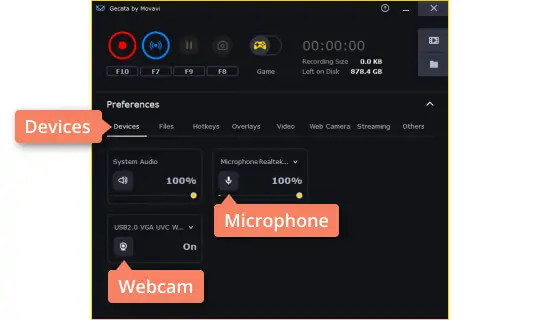
Step 4: Take Screenshots, Add Annotation/Texts (Optional)
While recording, just like Video Recorder, you are free to take screenshots, add annotations and texts.
Step 5: Save the Game Video.
After ending the recording, you can preview and edit the video. If you are satisfied with your recording, click Save to save your video.
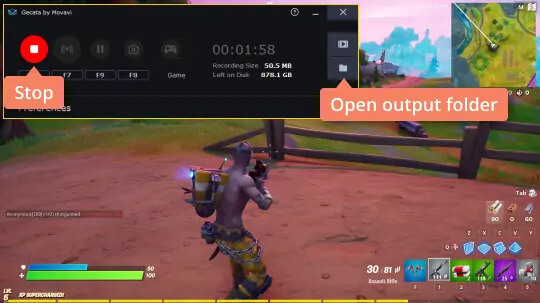
Tips: With Gecata, you can restore the accidentally quit or unsaved recording.
Just enable the recorder and you will see a prompt reminding you to restore the unsaved file. Or you can navigate to the recording history tab to continue saving the gameplay.
Record Steam Gameplay with OBS
OBS is another screen recorder used by many Steam gamers. Not only it can record videos on Steam, but it can also stream your gameplay to Twitch, YouTube, and more. It can record and Steam DirectX 8/9/10/11/12, OpenGL games on Steam at up to 120 fps. Games, webcam overlay, audio can all be recorded.
However, unlike Movavi Screen Recorder which you can start gameplay recording easily, OBS is complicated with a daunting interface. And since it is an open-source recording software, it is not stable enough and stops working, especially after an update.

Step 1. Download and install OBS on your computer. To install OBS, you need to run its Auto-Configuration Wizard, which may change your computer’s settings of recording, resolution, bitrate, encoder, and more.
Step 2. To record game audio on Steam, make sure you have selected the right audio devices. And you can adjust volume levels in the mixer section of its main window.
Step 3. Sources are what you are going to record with OBS. To record games on Steam, click Game Capture. If you need to add a webcam, click Video Capture Device.
If OBS shows the black screen in Game Capture, read how to fix OBS black screen.
Step 4. Open the game on Steam and click Start Recording on OBS to start recording your gameplay.

Record Steam Gameplay with Game DVR in Windows 10
For those who want to record Steam games on Windows 10, there is an easy recorder you can use – Windows 10’s built-in game recorder. By pressing Win + G buttons, you can initiate the Game DVR recorder, which can record gameplay on Steam with audio, microphone, and webcam. It is simple and you don’t have to download another application to get the job done.
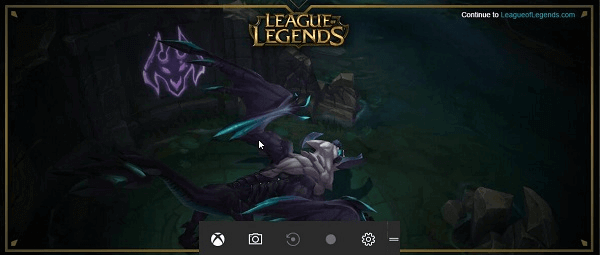
Although recording Steam games with Windows 10’s game recorder is convenient, it is too simple in functionality and you may be disappointed if you have a high-quality requirement. It was reported that Game DVR causes lags or frame drops on some computers.
Above all, you can see that each recorder has its features. Just like Movavi Screen Recorder, it is easy to use and record the Steam on Windows/Mac in high quality. To those who like to explore software, open-source like OBS is a good choice. If you don’t want to download another application, you can just record Steam in Windows 10.
To sum up, the 3 recorders mentioned above are all professional; however, in comparison, it’s not difficult to conclude that Movavi Screen Recorder is the best choice for recording Steam gameplay, especially after its new feature – Game Recorder had launched.
How useful was this post?
Click on a star to rate it!
Average rating / 5. Vote count:


